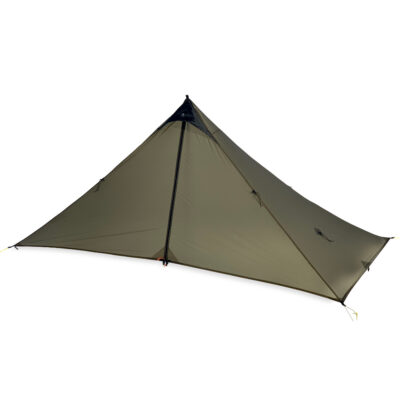
SPECIALIST TOOL FOR ULTRALIGHT, SUL AND FAST PACKING
NOTE: .5 DCF Out of Stock Due To Global Supply Issues. DO Not Order .5 DCF products at his time. We do have .8 DCF and 20d SilPoly in stock.
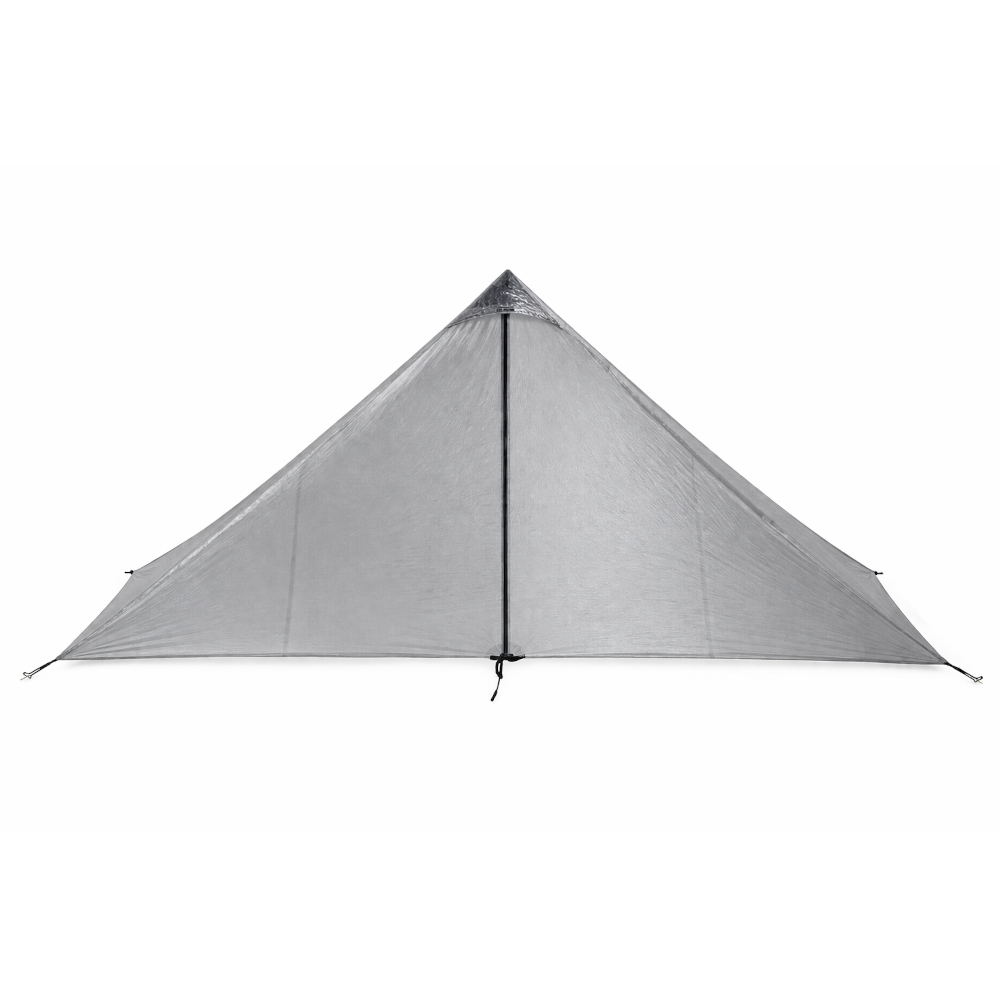
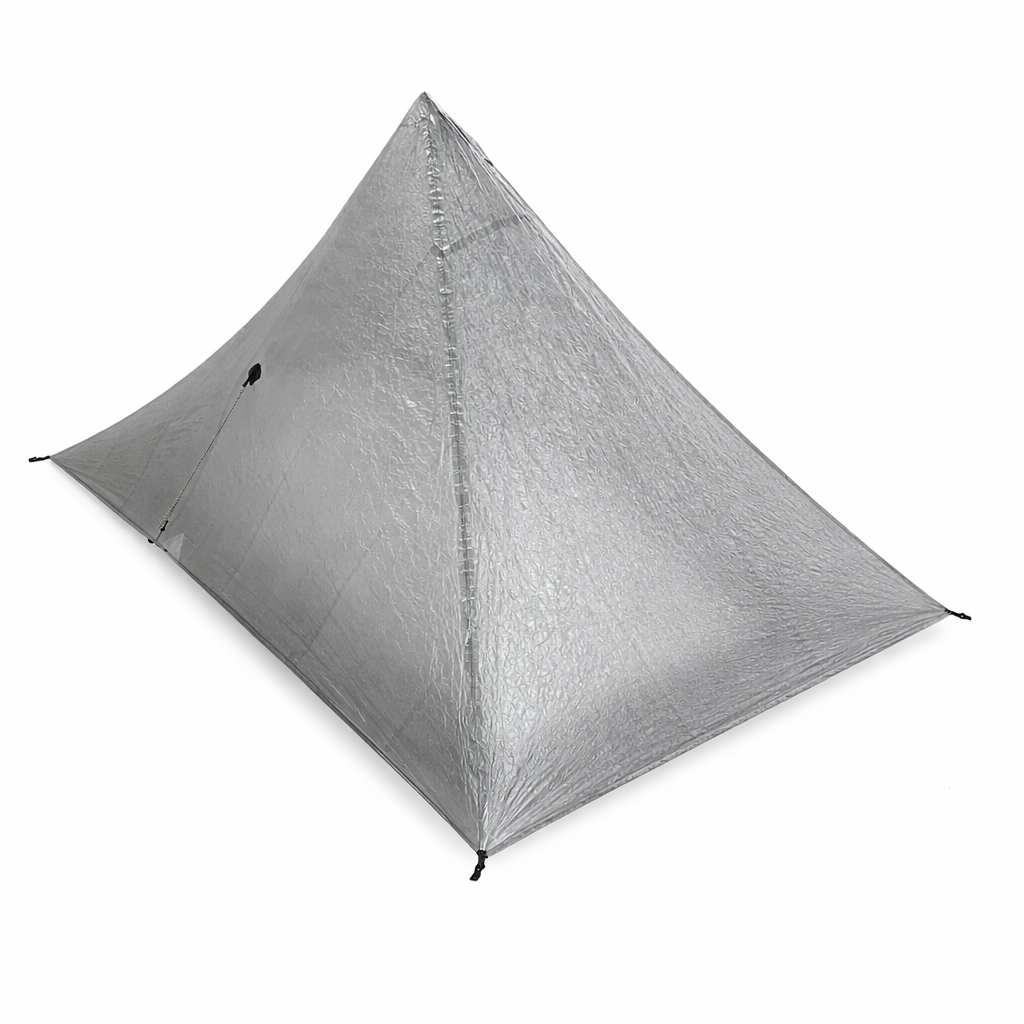
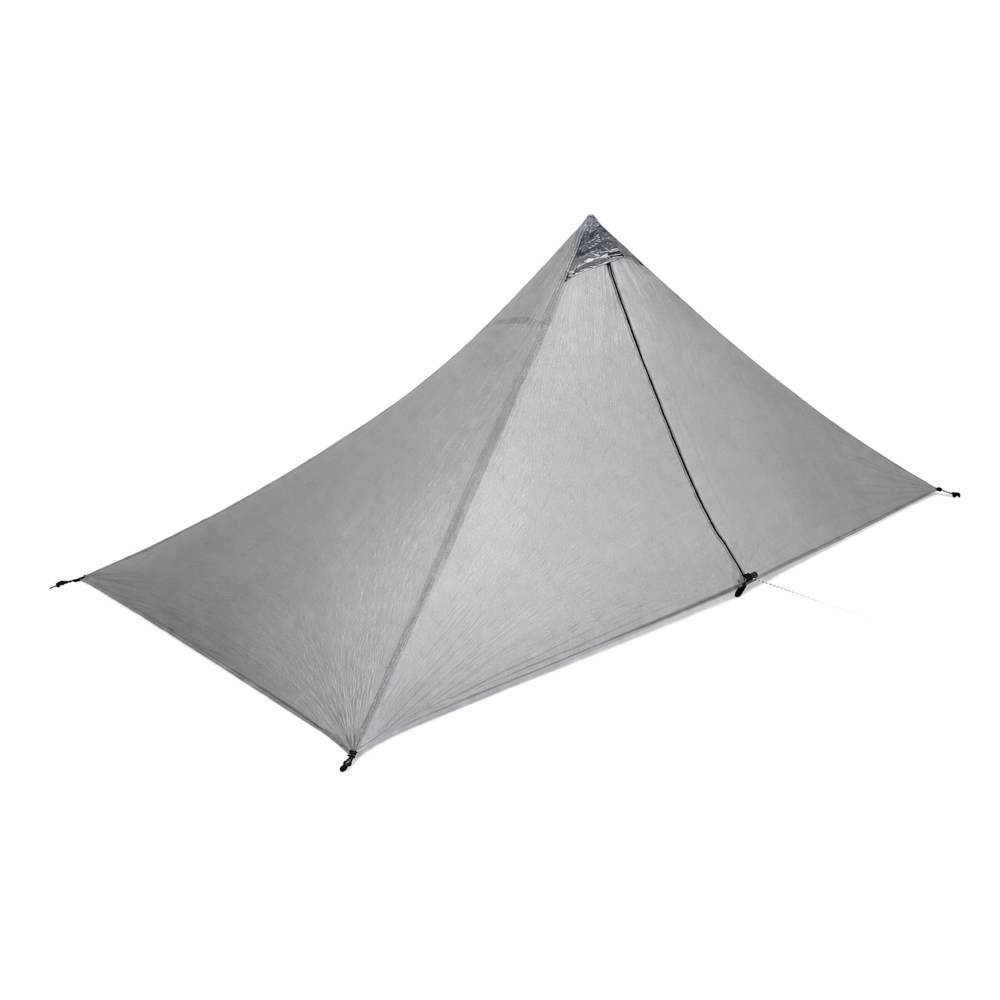
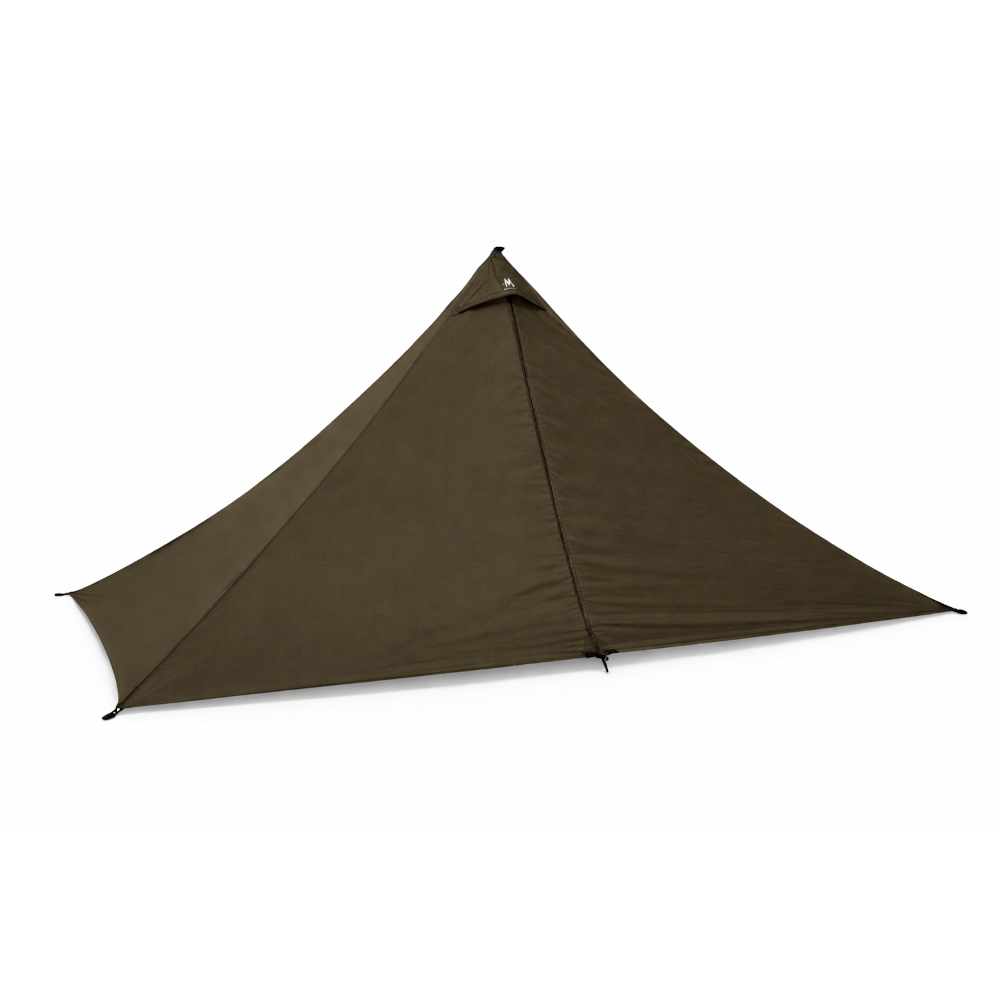
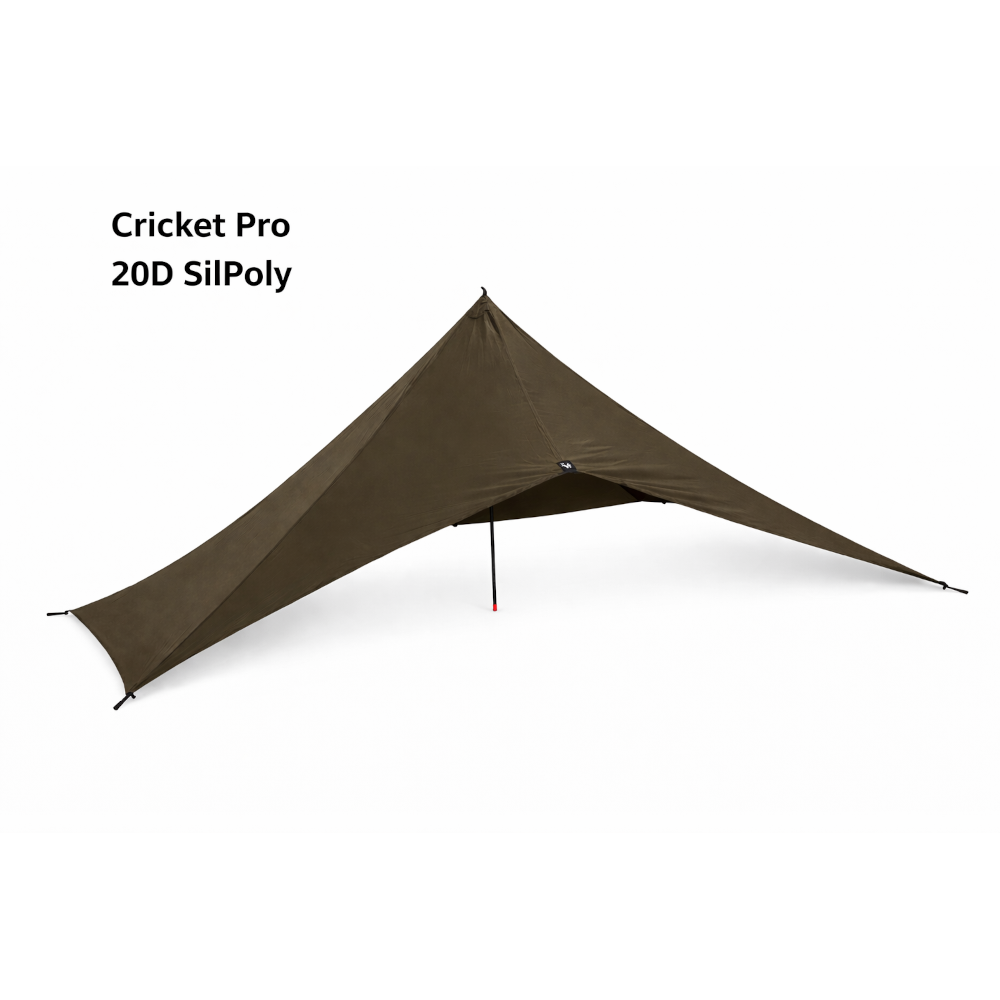
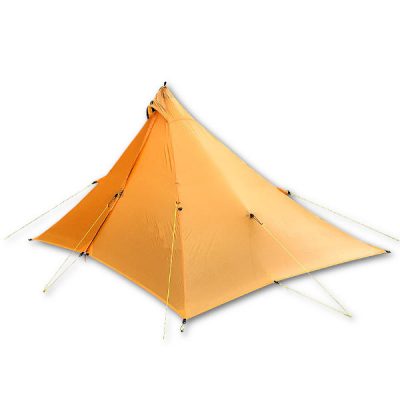
DIMENSIONS: 4.2’ x 9’ | 51” x 108” | 130cm x 275cm PEAK HEIGHT: 50″ | 127cm at 5” off the ground SOLOMID PRO WEIGHT: .5 DCF: 6.5 oz | 178 gm (With 6 linelocks removed – LL’s add .5oz/14gm.) 20D SilPoly: 10.4 oz | 294 gm CRICKET PRO WEIGHT: .5 DCF: 5.3 oz | 150 gm (With 6 linelocks removed /LL’s add .5oz/14gm.) 20D SilPoly: 9.1 oz | 257 gm The SOLOMID PRO is an outdoor specialist’s tool for Super Ultralight treks, racing and fast packing. It is not for everyone. Read the complete product description to decide if the PRO or another size MLD Mid is best for you. It’s an asymmetrical pyramid shape with ultra-fast stet up on small sites. 75% of the space is behind the one center pole, while the front 25% functions as a vestibule. This offset design allows dryer entry and exit to the sleep area. The CRICKET PRO swaps the zippered door of the SoloMid Pro for a beak. All other dimensions are the same. The SoloMid Pro and Cricket Pro are designed to be as light as possible with the minimum of features for Ultralight, Super Ultralight and Fast Packing adventures. It excels in 3 / 3 + season trips mostly below tree line for experienced hikers with solid campsite selection skills. HISTORY: Over 20 yrs ago MLD was building some of the first small pyramid shaped UL shelters. This SoloMid Pro is very close to the first SoloMid in size and function. The option of a perimeter bug netting is a throw back to the 1980’s when Ron sewed a bug net skirt to an old Chouinard Mid for climbing adventures. MLD has offered a perimeter bug net skirt on any Mid for decades. The OG SoloMid was about this size, but as sleep pads got thicker and wider we moved to taller and larger Mids to fit most all hikers with the Mid walls pitched tight to the ground for 4 Season protection. When the SoloMid Pro is pitched a few inches off the ground like most hikers do most of the time anyway, the interior space is functionally the same as the larger SoloMid XL pitched tight to the ground.
FEATURES
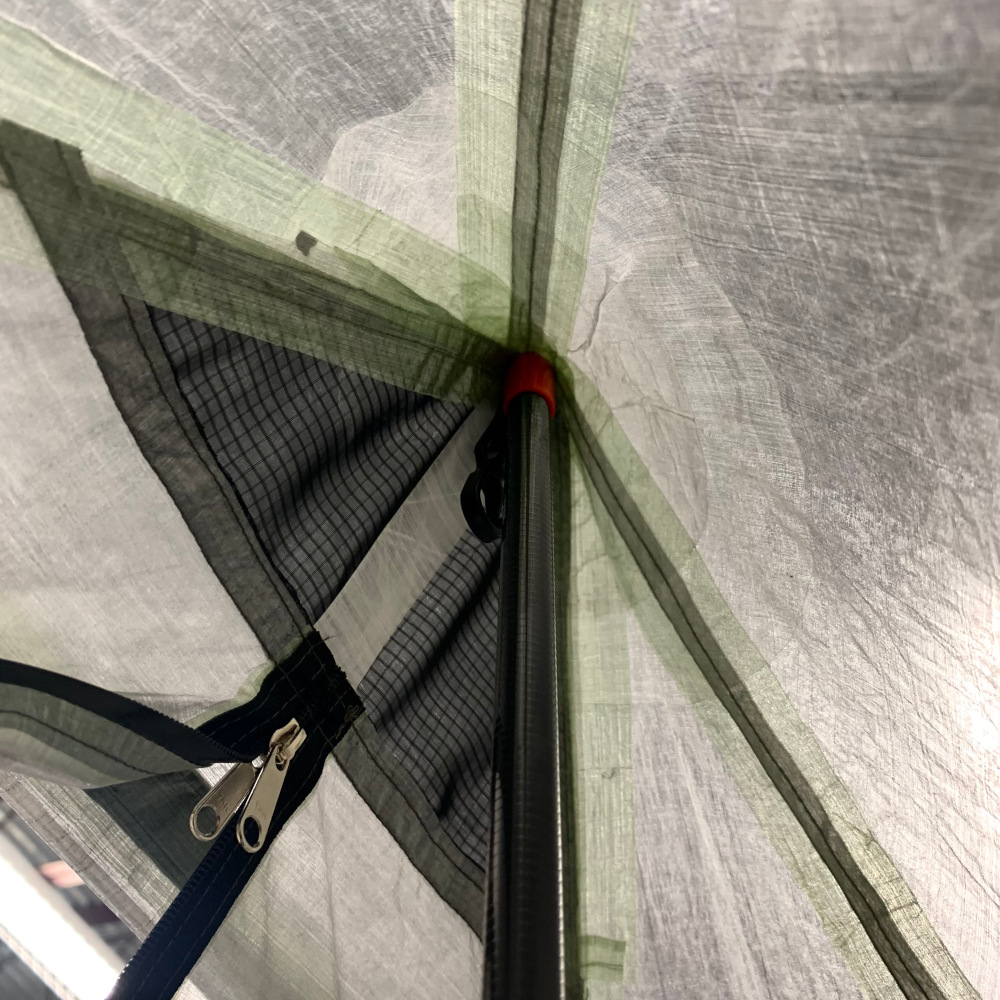
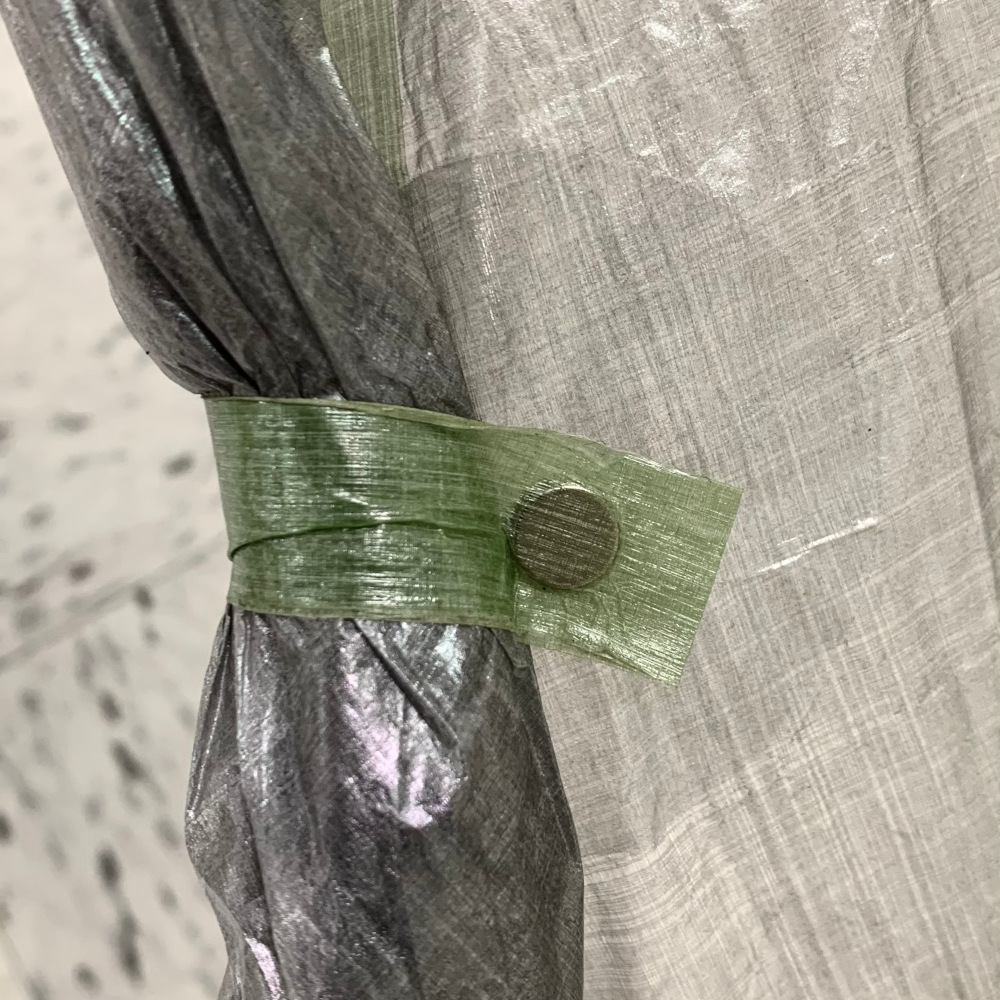
• Peak Vent backed by bug netting in SoloMid Pro • 20d SILPOLY LW VERSION: Dark OD Green. Strong and fully waterproof with triple stitched seams. 2,500 + mm waterproofness. (A slightly lighter version of our standard 20d SilPoly.) • .5 DCF VERSION: Light Gray. All seams sealed and taped. • #3 YKK Aqua Guard Zipper in SoloMid • Interior Apex Hang Loop • 2 interior overhead hang loops. • Reinforced Peak • Right door rolls open. Magnetic latch on DCF version. Hook + Ring on SilPoly version. • Fast set up with only 6 ground level perimeter tie-outs • LineLocks not included in base weight can be user removed to save about 15 gms. Fits most 1.7mm – 2.2 mm line. • 4 overhead gear hang loops to clip up bivy hoods, lights or InnerNets. • Clips at the four corners for an InnerNet. • Works perfectly with all 125cm or longer adjustable poles. No pole jack needed.
INCLUDES
• SilPoly Stuff Sack (.35 oz | 99 gms) • 20’ MLD 1.8mm Guyline (.25 oz | 7 gm) • 1.5 oz Tube McNett Silnet Seam Sealer with SilPoly version. DCF version is sealed and no extra sealer needed. Suggested Stakes: • MLD NanoNail 6.5” Carbon Fiber Stakes (.31 oz | 8.8 gm each) https://mountainlaureldesigns.com/product/mld-carbon-fiber-nanonail-stakes/
NOTES
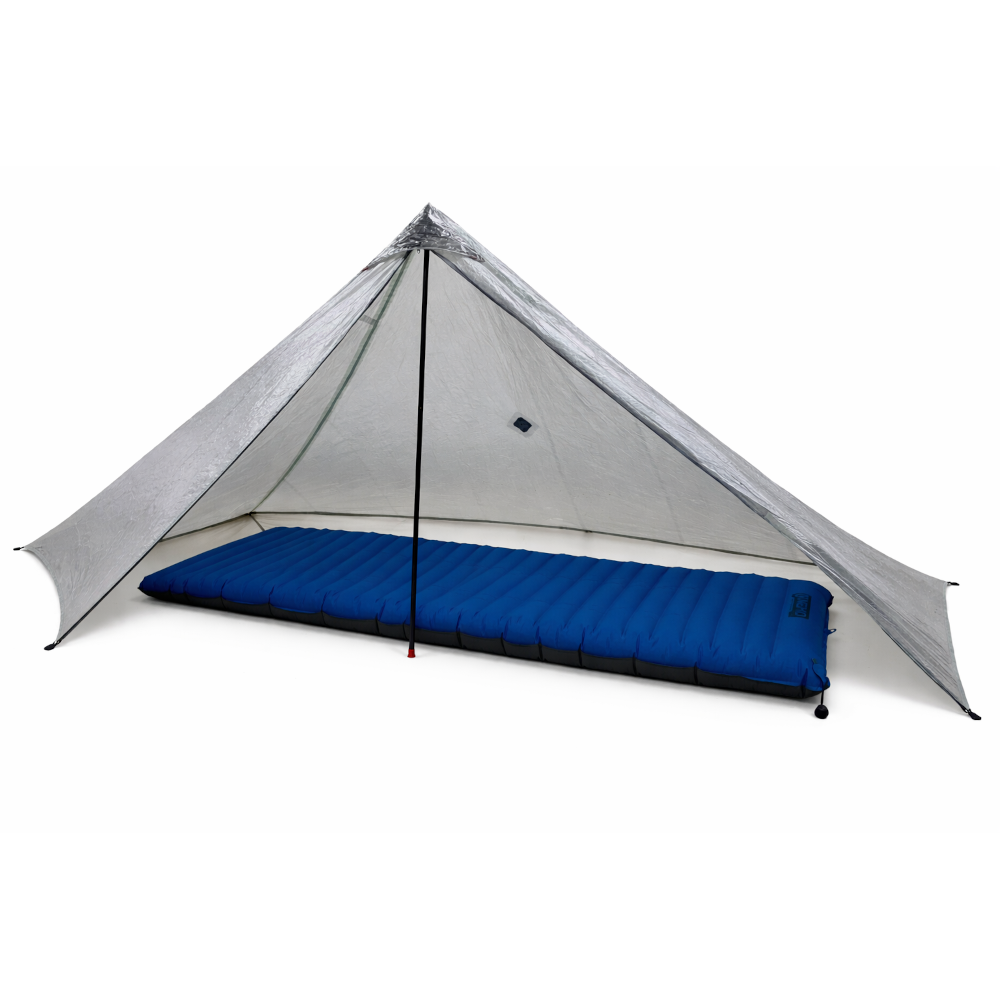
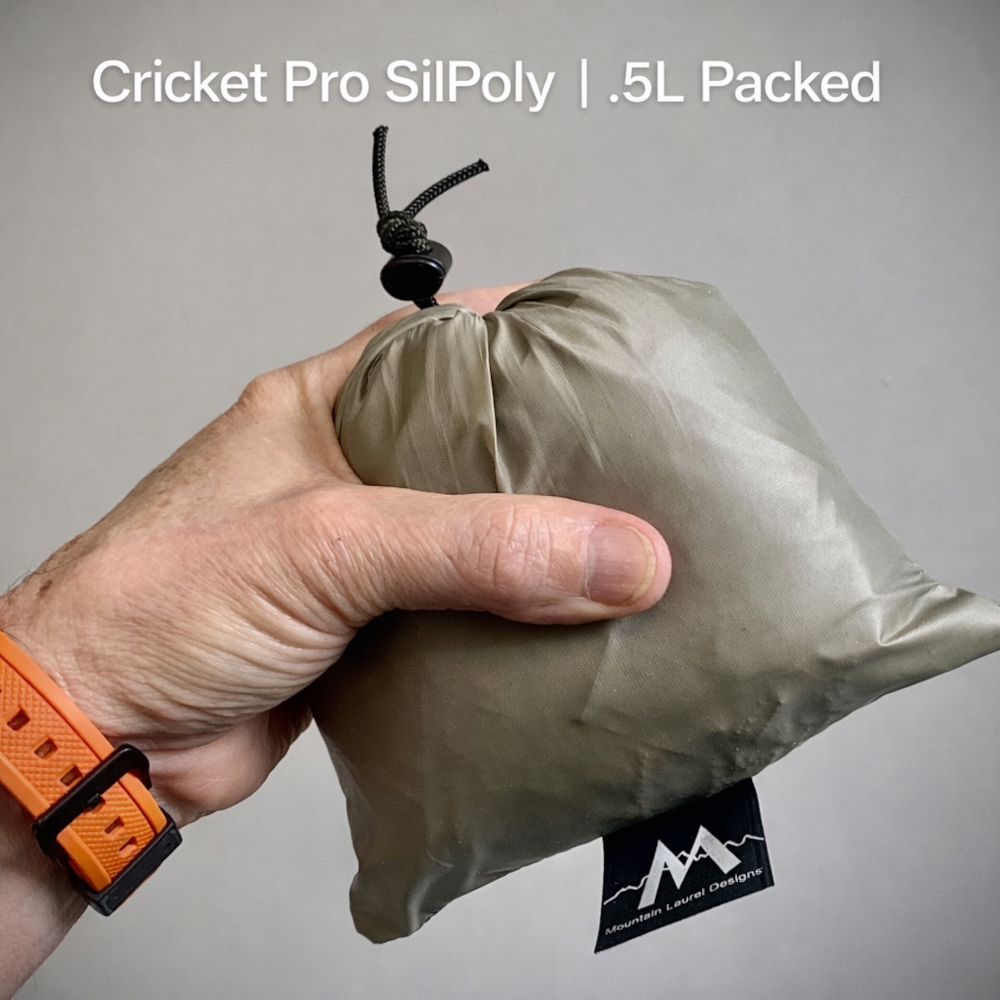
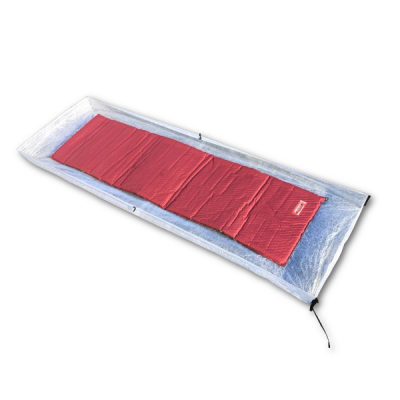
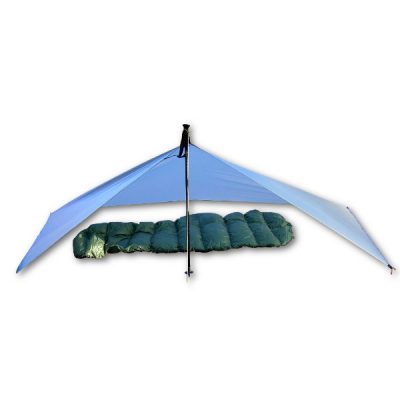
• Packed size of the SoloMid in Silpoly is about .75L and the Cricket .5L. That’s Tiny! Smaller than the size of a 1L Nalgene bottle. The DCF versions pack about 20% larger than the SilPoly. • Most hardcore SUL users will remove the linelocks and tie a loop of guyline to make a 16″ long loop with a few knots in the loopto form a daisy chains for stake adjustment. 6 linelocks removed /LL’s save.5oz/14gm. Rectangular and square Pyramids are super easy to stake out tight and retension for any reason by just raising the pole an inch. • Like most mfgr specs for UL and SUL gear, the base weight of the shleter is the shelter only. No line, stuff sack or stakes. • Picture of the blue pad: The pad is 78″ X 25″ X 4″ • If you need a pole, we offer the MLD Omni Camlock Pole. For this small Mid you can remove one section of the pole to get a 4 Section adjustable 52” pole at 4.4oz. • We include a SilPoly stuff sack n/c in base weight. It is .35 oz | 99 gms. You may also get one of our Medium DCF Stuff Sacks separately to save weight. • The UL 20d SilPoly in dark Olive Green we use in the PRO is .2oz sqy lighter than our standard 20d SilPoly. It is not quite as strong and the HH rating is a bit lower and the dry stretch is a bit higher than the super 4 season 20d SilPoly in our larger shelters. The UL SilPoly works great for the Solomid and Cricket PRO for 3 and 3+ season use. https://www.youtube.com/watch?v=kQva_v53N24
SIZE AND FIT NOTES:
The SoloMid Pro is designed to be as light as possible for safe 3 / 3+ season adventures mostly camping below tree line. It will fit most UL and SUL hikers well while sleeping and the size reflects that goal. It is not a large 4 season tent like the extremely roomy and robust SoloMid XL. This Pro tent may not be for you. Most similar pyramid shelters from many manufacturers are spec’d and pictured with the tent pitched a few inches off the ground like most hikers regularly use the tent for good ventilation and to fit an InnerNet. Most measure the height that way vs a tight to ground pitch. Most UL and SUL hikers do not spend a lot of awake time in thier shelter and value the trade of a bit of very short term awake move around room for less weight on the back. * Will you Fit? • MLD Mr. Ron is 6’1″ and uses a 3″ sleep pad. He pitches it about 5″ off the ground and uses a SuperLight Bivy Sack. He fits Well. • If the tent is pitched 6” off the ground with a pole length of 130cm / 50” and you are under 6’1” on a 3” thick sleep pad or less, you will fit OK. • If the tent is pitched 3” off the ground with a pole length of 125cm / 48” and you are under 5’10” on a 3” thick sleep pad or less, you will fit OK. • If the tent is pitched 1” off the ground with a pole length of 120cm / 46” and you are under 5’8” on a 3” thick sleep pad or less, you will fit OK. • Pro InnerNet users up to 6′ will need to pitch the outter Mid 6″ off the ground and the netting may touch the toe area of sleep quilt. • Pro InnerNet users under 5’10” will fit well. • Users under 5’10” should fit well at any pitch height and if you are on a thinner sleep pad under 3” you will have even more room. **** If you are over 6’1″ you should consider the SoloMid XL and we can also build that in custom .5DCF with a #3 zipper to save weight. Email Us.***
DIMENSIONS: 4.2’ x 9’ | 51” x 108” | 130cm x 275cm
PEAK HEIGHT: 50″ | 127 cm at 5” off the ground
SOLOMID PRO WEIGHT:
DCF: 6.5 oz | 178 gm. (With 6 linelocks removed /LL’s add .5oz/14gm.)
20D SilPoly: 10.4 oz | 294 gm
CRICKET PRO WEIGHT:
DCF: 5.3 oz | 150 gm (With 6 linelocks removed /LL’s add .5oz/14gm.)
20D SilPoly: 9.1 oz | 257 gm
COLORS:
DCF: Light Gray
20D SilPoly: Dark OD Green
Suggested Stakes
• MLD NanoNail 6.5” Carbon Fiber Stakes (.31 oz | 8.8 gm each)
MLD Carbon Fiber NanoNail ™️ Tent Stakes
CUSTOM SUL PERIMETER BUG NET SKIRT
COST: $60
WEIGHT: +2.4 oz | 68 gms
Adds a 19” tall bug net skirt around perimeter of the SoloMid. Available on the SoloMid Pro ONLY. DCF SoloMid Pro with bug net skirt is 8.95oz with linelocks removed.
.67 DCF FULL PRO INNERNET
COST: $235
WEIGHT: 7.5 oz | 212 gm
DIMENSION: 30” X 86” X 7”
A full InnerNet with a DCF floor and bug net walls for total bug protection.
SILPOLY FULL PRO INNERNET
COST: $155
WEIGHT: 9.5 oz | 274 gm
DIMENSION: 30” X 86” X 7”
A full InnerNet with a SilPoly floor and bug net walls for total bug protection.
.67 DCF PRO FLOOR
COST: $145
WEIGHT: 3.5 oz | 99 gms
DIMENSION: 30” X 86” X 7”
A DCF Floor ONLY made with 7” walls.
SILPOLY PRO FLOOR
COST: $75
WEIGHT: 5.5 oz | 155 gms
DIMENSION: 30” X 86” X 7”
A SilPoly floor ONLY that clips into the SoloMid.
MLD PRO SILPOLY SEAM SEALING
COST: $40
WEIGHT: APPROX: + 0.5 oz | 14 gm
The SilPoly version of this shelter requires seam sealing, and we include seam sealer with all our SilPoly & SilNylon shelters. You can seam seal this shelter yourself in about 30 minutes with the supplied seam sealer OR as an extra service we can do it for you! Watch he how to video HERE.
We use a diluted 100% Silicone Sealer on the exterior stitching above the lower hem. Factory seam sealing can add about 1 week to the order process. Seam sealing adds about 0.5 oz | 14 gm +/- depending on the shelter size.
Factory sealed shelters are returnable under the regular return policy, where as DYI seam sealing is not.
We STRONGLY suggest you pitch the shelter and test before a trip. Set up before a good rain or spray with a garden hose nozzle arching up in the air and down on the shelter simulating rain for at least 15 min. Touch up to areas may be needed.
NOTE: DCF shelters do not need seam sealing.
MLD CAMLOCK POLE
COST: $45
WEIGHT: 5 OZ | 142 GM
FOLDED LENGTH: 16″ | 40 CM
ADJUSTABLE LENGTH: 53″ to 65″ | 134.6 to 165.1 CM
Don’t hike with trekking poles? No worries, get a MLD Camlock Pole. The MLD Omni Camlock Poles are strong enough for any single-pole pyramid-style tent. Adjustable from 53″ to 65″. Sections can be easily removed to make it almost any length. MORE INFO…
Each of our SilPoly and SilNylon shelters comes with one tube of McNett Sil-Net Seam Sealer. It is STRONGLY recommended you use this supplied seam sealer to seal and strengthen the seams of your shelter.**DCF (Dyneema® Composite Fabric A.K.A. Cuben Fiber) Shelters do not need seam sealed.**
INSTRUCTIONS
1. Pitch and inspect your shelter for any issues. Once it is seam sealed, it is non-returnable except for significant defects.
2. Use the supplied SilNet Sealer and ONLY the SilNet Sealer. (If you want to dilute it or use some other silicone sealant it should work OK and is common (research this yourself online) but, you are on your own- results may vary and are not covered by warranty! If you go this route, it is assumed you know 100% what you are doing and have done it before!!!)
3. Pitch the shelter tightly. Temperatures should be above 60 F and humidity below 80%. You may do this indoors. You may also do one seam at a time indoors if the seam is stretched slightly. Pinning one seam from each end on the floor between two heavy objects works OK.
4. We use the SilNet straight from the tube. Do not make a big hole in the sealer tube – start small so that you can control flow. Multiple small application is a lot better than one big smear.
5. Main Seams: Place a small bead on the seam along the stitching. Work on a 3’- 4’ section at a time. Use a finger to press the sealer into the stitching and the small valley at the edge of the seam where it is rolled under.
ALLOW AT LEAST 24 HOURS TO FULLY DRY.
NOTE: You only need to seal the OUTSIDE of the shelter. You do not need to seal the bottom perimeter roller edge stitching. It is OK to add a small bead on the leading edge of the triangle tie-outs reinforcement stitching, but it is not required.
SPECIAL AREAS: Add a little sealer to any tie-out stitching on the middle of a panel (Mids, Cricket, and SuperTarps). Seal the zipper storm flap stitching and tie-outs on the Mids. Seal the stitching and apex tie-outs areas on the Mids, Crickets, and TrailStars.
IMPORTANT: Do no go back and forth over the wet seam too much – after a minute or three it will get gummy and look bad; it is better to wait for 8 hrs and then add some over any area you missed.
Watch a how to video HERE.
A four-sided pyramid tent is one of the easiest shelters to set up! After a few test pitches, most users can set it in in under 2 min on a normal day, and under 1 min when properly motivated!
PREPARATION:
Cut four 18 in | 46 cm guylines. Tie a 2 in | 5 cm stake loop on one end. Thread the free end of the guyline into the corner LineLocks on the shelter, then up through the rear LineLock slot/hole, over the bar and down through the front LineLock slot/hole. Tie an overhand knot with a 1 in | 2.5 cm tail to prevent the line from pulling out of the LineLock.
FIRST SET UP:
1. Adjust the corner guylines to be short – no more than 2 in | 5 cm of slack from the LineLock.
2: Stake out the rear corners to the ground. The rear wall baseline between the corners should be medium tight, with no slack.
3: Stake out the front corners. The side baseline of the shelter should be tight. Watch the angle formed by the rear and side walls of the shelter at the rear corners and position the front corners so that the rear corners form 90-degree angles. The goal is to have a perfectly square/rectangle floor base. As viewed from overhead the corners and corner guylines form a perfect X shape right out to the stakes.
4: Unzip the front door leaving the bottom buckle snapped.
5: Reach or step in and insert the center pole – adjust it’s height to make the shelter tight.
6: Now you can cut and add any other mid-panel or mid-baseline guylines as needed. The lengths needed will be obvious.
NOTE: Use a small bungee loop on any center panel tie-outs to limit wind force on that tie-outs. DO NOT stake out a center side panel tie-outs too much – it should only move the wall a couple of inches out at most! DO NOT pull it so far it changes the shape of the mid-wall.
That’s It!!! The shelter should be tight and square. You can slightly tighten each corner LineLock if needed.
Almost all setup problems occur when the shelter floor is not square, with all corner angles as close to 90-degrees as possible, or slack is left in the corner guylines.
NOTE: See the setup info for attaching the InnerNets on the InnerNet product page.
Your first setup is a good time to seam seal your shelter IF you have purchased a SilNylon version and did not have it factory seam sealed. Use the SilNet supplied to seal the main seams, center panels tie-outs, door zipper stitching, and the apex stitching. Use only a SMALL amount and do not go back over an area after 5 min. You can use your finger to push the sealer into the seams. If you miss a spot, wait until it is dry and then re-coat as necessary. See ‘Seam Sealing’ tab for instructions.
DOWNLOAD AS PDF


Joe (verified owner) –
Ron nailed it with the Solomid Pro. Perfect size all round.. height, length and width. I am 5’10 and laying down under it leaves so much extra space, I can even sit up and not touch my head.. using poles @125 cm.. about 49.5 inches. The color of the Silpoly is perfect, to me it looks dark woodsy brown. It packs up so small. Its simple and fast to pitch and yes, very light weight. There is nothing not to like about it.